Category Archives: ARC Raiders

Where to Find Fossilized Lightning in Arc Raiders

Fossilized Lightning is a rare epic-tier topside material in Arc Raiders, highly valued for its ability to be recycled into premium Explosive Compound. Unlike common crafting resources that spawn in fixed loot containers or enemy drops, this unique ARC Raiders Items relies entirely on dynamic in-game weather events. It cannot be crafted, purchased, or found in regular map looting spots, making it one of the most exclusive collectibles in the game. Mastering its spawn rules is key to farming this precious resource efficiently.

Core Spawn Condition: Electromagnetic Storms

The only way to encounter Fossilized Lightning is during active Electromagnetic Storm map modifiers in raids. No other weather or map condition can trigger its spawn, so players must prioritize entering raids marked with this specific storm event. These intense electromagnetic storms blanket the entire map with frequent lightning strikes that crash into outdoor terrain.

Each lightning strike carries a small chance to generate Fossilized Lightning, with roughly one out of eight strikes producing the item. This random spawn rate means patience is essential, even when the storm is active. Players will never find this resource indoors, as it is strictly classified as a topside outdoor spawn.

Best In-Game Spawn Locations

While Fossilized Lightning spawns randomly at lightning strike sites during storms, certain open areas yield higher success rates. The Blue Gate region is the most reliable spot for farming this resource. Its wide, flat outdoor terrain has minimal obstacles, allowing lightning strikes to land consistently and creating more potential spawn points.

Other viable locations include open plains and barren crater zones across all storm-affected maps. Lightning strikes often carve small craters on impact, and Fossilized Lightning typically appears as a subtle glowing root-like formation at the center of these craters. Dense buildings or enclosed structures block lightning strikes, so players must avoid urban indoor zones during farming runs.

Tips for Successful Farming

To maximize loot chances, players should stay exposed in open topside areas throughout the storm. Avoid taking cover indoors, as this completely halts potential spawn opportunities. After each lightning strike, quickly scan the ground for faint glowing markers that signal Fossilized Lightning spawns. Although Fossilized Lightning cannot be obtained directly through purchase, if you require other resources, you can choose to buy cheap ARC Raiders Materials, blueprints, and other items on MMOEXP.

These popular storm zones often attract other enemy raiders, bringing PvP risks. Players should balance looting speed with situational awareness, keeping escape routes clear to secure their loot. Once collected, safely extract from the raid to retain the rare Fossilized Lightning for crafting or trading.

ARC Raiders Bastion Guide: How to Defeat, Farm Loot, and Maximize Rewards

In ARC Raiders, few enemies command as much respect-and fear-as the Bastion. This heavily armored ARC unit is one of the most dangerous PvE threats in the game, combining immense durability with devastating firepower. However, for players willing to take the risk, defeating a Bastion offers some of the best opportunities to farm high-value ARC Raiders Items and accelerate endgame progression.

In this guide, we’ll break down everything you need to know about the Bastion, including its weaknesses, best strategies, optimal loadouts, and how to farm it efficiently.

What Is the Bastion in ARC Raiders?

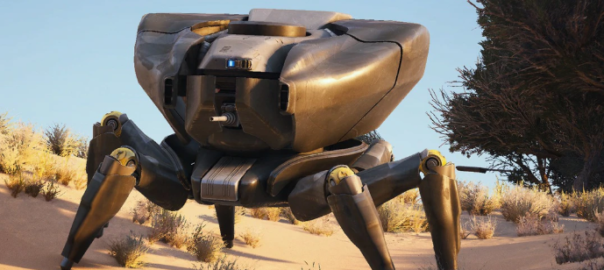
The Bastion is a high-threat ARC enemy that patrols valuable loot zones across multiple maps. Designed as a tank-like unit, it features:

·Heavy armor plating that significantly reduces incoming damage

·A large health pool (around 2050 HP)

·A powerful Gatling-style projectile attack

·Strong presence in high-loot areas

Because of its defensive capabilities and aggressive attacks, the Bastion is not an enemy you can defeat casually. However, its drops make it one of the most rewarding targets in the game.

Bastion Weaknesses Explained

Despite its intimidating appearance, the Bastion has several exploitable weak points that can dramatically shorten the fight.

Primary Weak Points:

·Leg joints (yellow sections): Easier to damage and can reduce mobility

·Rear canister: Destroying it exposes a critical vulnerability

·Internal core: Revealed after breaking armor, allowing massive damage

Focusing your attacks on these areas is essential. Shooting randomly at its armored body will waste ammo and prolong the fight unnecessarily.

Best Strategy to Kill the Bastion

1. Use Cover and Positioning

The Bastion’s main attack is a rapid-fire projectile volley that can eliminate players almost instantly.

·Always fight near solid cover, like buildings or large debris

·Break the line of sight when you hear the attack charging

·Avoid open areas at all costs

Positioning is the difference between survival and instant defeat.

2. Attack Between Firing Windows

The Bastion attacks in bursts, creating short opportunities to deal damage.

·Wait for it to finish firing

·Step out from cover

·Target weak points quickly

·Retreat before the next attack

Mastering this rhythm is key, especially for solo players.

3. Break Armor and Focus the Core

Once you destroy the rear canister, the Bastion’s internal core becomes exposed.

·Circle behind the enemy when possible

·Focus sustained fire on the exposed area

·Use high-damage weapons for maximum efficiency

This phase is your best opportunity to end the fight quickly.

4. Use Explosives for Burst Damage

Explosives are extremely effective against heavily armored enemies.

·Grenades can deal significant damage to weak points

·Mines can be pre-placed for strategic bursts

·Combined damage can shorten fights dramatically

Advanced players often rely on explosives to speed up Bastion kills.

5. Watch for Third-Party Threats

Bastion fights are loud and attract attention.

·Other ARC enemies may join the fight

·Enemy players may attempt ambushes

·Always stay aware of your surroundings

Even if you defeat the Bastion, you can still lose everything if you’re caught off guard.

Best Loadout for Bastion Fights

Preparation is critical when facing such a durable enemy. Your loadout should be built for sustained damage and survivability.

Recommended Gear:

·Armor-piercing or heavy weapons

·Medium or heavy shields

·Advanced healing items

·Explosives and utility gadgets

Many players prepare for these encounters by upgrading their equipment in advance. Some even choose to buy ARC Raiders BluePrints to unlock stronger weapons and tools, giving them a clear advantage in both damage output and survivability.

Loot and Rewards: Why Bastions Are Worth Farming

Defeating a Bastion is one of the most reliable ways to obtain high-tier ARC Raiders Items.

Key Rewards Include:

·Bastion Cell (valuable crafting material)

·ARC Alloy and Mechanical Components

·Advanced ARC Powercells

·Medium Gun Parts and ammunition

These materials are essential for crafting, upgrading gear, and progressing into tougher content. For many players, Bastion farming becomes a core gameplay loop in the late game.

Efficient Bastion Farming Strategy

If you want to maximize your gains, you need a structured approach.

1. Scout Spawn Locations

Learn where Bastions typically appear and plan your routes accordingly.

2. Engage Only When Prepared

Never start a Bastion fight without proper gear and resources.

3. Use Hit-and-Run Tactics

·Attack during safe windows

·Retreat to recover and reposition

·Repeat until the Bastion is defeated

This minimizes damage taken and conserves resources.

4. Extract Immediately After Looting

Once you secure your rewards:

·Avoid unnecessary fights

·Head directly to extraction

·Don’t risk losing valuable loot

Because Bastions often guard high-value zones, combining these fights with general looting is one of the best ways to farm ARC Raiders Items efficiently.

Common Mistakes to Avoid

Even experienced players can struggle if they overlook key mechanics.

·Fighting in open areas: Leads to instant death

·Ignoring weak points: Wastes ammo and time

·Overcommitting to damage: Reduces survivability

·Poor preparation: Lack of healing or gear leads to failure

Avoiding these mistakes will greatly improve your success rate.

Final Thoughts

The Bastion is one of the toughest PvE enemies in ARC Raiders, but it’s also one of the most rewarding. With the right strategy, positioning, and preparation, you can consistently defeat this armored threat and gain access to some of the most valuable ARC Raiders Items in the game.

ARC Raiders: How to Find Light Bulbs

Light Bulbs are among the most essential yet elusive electrical components in ARC Raiders. Classified as “uncommon” trinkets, they are critical for progressing through the Expedition Project’s third phase, crafting advanced gear, and completing event tasks like the Flickering Flames event. What makes them tricky is their inconsistent spawn rates in general loot zones-unless you know where to look.

Unlike other resources that spawn randomly across maps, Light Bulbs follow a thematic loot logic, tying their appearance to electrical infrastructure, vehicles, and specific containers. This guide breaks down the best maps, guaranteed spawn spots, and pro tips to farm Light Bulbs efficiently, so you never get stuck waiting for RNG to favor you.

First: Why Light Bulbs Matter in ARC Raiders

Before diving into scavenging strategies, it’s important to understand why Light Bulbs are non-negotiable for your raider’s progression. They are a core ingredient for the Expedition Project’s “Framework” phase, which requires five Light Bulbs to unlock the next stage and earn rewards like the Red Light Stick blueprint and 1,000 merits.

Beyond quest progression, Light Bulbs can be sold to vendors for 2,000 ARC Raiders Coins each, making them a reliable source of in-game currency if you have a surplus. They cannot be crafted or recycled, so scavenging is your only way to obtain them-which is why knowing their spawn patterns is key.

Many players waste hours searching random electrical zones, but Light Bulbs rarely spawn in large quantities there. Instead, they favor specific containers and locations, with two maps standing out as the best farming grounds: Dam Battlegrounds and Blue Gate.

Best Maps for Finding Light Bulbs

While Light Bulbs can spawn on all ARC Raiders maps, community data and in-game testing confirm that two maps account for over 80% of all Light Bulb finds. Prioritizing these maps will cut your scavenging time in half.

1. Dam Battlegrounds (Top Farming Map)

Dam Battlegrounds is the undisputed best map for Light Bulbs, accounting for 61% of all reported finds. Its high concentration of electrical zones, vehicles, and guaranteed spawn spots makes it the go-to for efficient farming.

The map’s layout is ideal for quick, targeted scavenging, with two cars that have an almost 100% chance of spawning Light Bulbs. These spots are consistent enough that you can gather all five Light Bulbs needed for the Expedition Project in just four or five runs.

2. Blue Gate (Quieter Alternative)

Blue Gate comes in second, contributing 21% of Light Bulb finds. It’s a great option if Dam Battlegrounds is heavily contested by other raiders or ARC forces. The map’s underground tunnels and scattered vehicles offer reliable spawns without the high PvP risk.

Light Bulbs here are often found in the tunnels beneath Blue Gate, particularly near the Headhouse or Checkpoint POIs, as well as in cars scattered across the map’s surface. It’s a slower farm than Dam Battlegrounds but ideal for solo players.

Guaranteed Spawn Spots: No More RNG

The biggest frustration with Light Bulbs is their randomness-unless you use these guaranteed (or near-guaranteed) spawn spots. These locations have been tested extensively by the ARC Raiders community and consistently yield Light Bulbs.

Dam Battlegrounds: Electrical Substation White Car

The most reliable Light Bulb spawn in the game is at the Electrical Substation in the southern part of Dam Battlegrounds. Locate the substation’s main building, then head to its south side, near the broken wire fence.

Parked beside the fence is a lone white car. Breach its hood and search the interior-you’ll almost always find 1-2 Light Bulbs here. This spot is quick to reach and has minimal enemy activity, making it perfect for beginners.

Dam Battlegrounds: Generator Hall Car

For a second guaranteed spot, head to the Generator Hall in the northern part of Dam Battlegrounds. Navigate to the extraction lift at the hall’s north end, then move slightly southeast to find a rusted car near a cluster of broken buses.

Breach the car’s hood, and you’ll likely find another Light Bulb. This spot is riskier due to more frequent ARC patrols (especially rocket-wielding enemies), so move quickly, loot, and retreat to safety.

Blue Gate: Pilgrim’s Peak Loot Containers

On Blue Gate, head to Pilgrim’s Peak-a towering antenna structure in the north. Search the industrial loot containers near the peak’s base and in the surrounding tunnels. These containers have a high spawn rate for Light Bulbs, especially if you’re looting in groups.

You can also find Light Bulbs in cars within Blue Gate’s underground tunnels. Access the tunnels via the Central Checkpoint or Warehouse Complex, then check every vehicle you encounter-their hoods often hide Light Bulbs.

Top Containers to Search for Light Bulbs

Light Bulbs spawn most frequently in specific container types, so prioritizing these will boost your chances. Community data shows that 43% of Light Bulbs are found in cars, 33% in lockers, and 13% in breachable containers.

Cars (Highest Spawn Rate)

Cars are your best bet for Light Bulbs, especially white vehicles. Breach their hoods to search the engine compartment-this is where Light Bulbs most commonly spawn. Focus on cars near electrical zones for even better odds.

On Dam Battlegrounds, the northern highway and Power Generation Complex have the densest concentration of cars. On Blue Gate, check cars in the Warehouse Complex and tunnel networks.

Lockers and Industrial Containers

Red lockers and industrial loot containers are the second-most reliable source. Look for lockers in residential areas (like Ruby Residences on Buried City) and industrial zones (like the Power Generation Complex on Dam Battlegrounds).

Industrial containers, often marked with yellow caution signs, are also worth checking. They’re common in warehouse areas and near electrical infrastructure, where Light Bulbs’ spawn rates are boosted.

Electrical Infrastructure

While general electrical zones aren’t the most efficient, specific electrical infrastructure-like fuse boxes, control panels, and broken lighting rigs-can yield Light Bulbs. Target these in the Electrical Substation and Power Generation Complex on Dam Battlegrounds.

Look for the lightning bolt icon on your map to find electrical zones. These areas are thematic for Light Bulbs, so even if you don’t find them in containers, you may spot them near junction boxes or power panels.

Pro Tips for Efficient Light Bulb Scavenging

Finding Light Bulbs is as much about strategy as it is about knowing where to look. Use these tips to maximize your efficiency and avoid wasting time on fruitless searches.

Plan Your Route Before Spawning

Before dropping into a match, mark your target locations on the map. For Dam Battlegrounds, plot a route from the Electrical Substation to the Generator Hall-this lets you hit both guaranteed spots in one run.

Avoid wandering aimlessly. Stick to electrical zones and car-dense areas, and ignore general loot zones (marked with a crate icon) where Light Bulbs spawn at near-zero rates.

Travel Light and Prioritize Extraction

Light Bulbs are lightweight (0.2 kg each) and stack up to 3, so you can carry multiple without weighing down your inventory. Minimize your initial gear to maximize the number of Light Bulbs you can extract.

Once you’ve collected 3-4 Light Bulbs, don’t greed for more. Head to the nearest extraction point to secure your loot-losing your hard-found bulbs to ARC forces or rival raiders is a costly mistake.

Stay Alert in High-Traffic Spots

Guaranteed spawn spots like the Electrical Substation are well-known to other raiders. Approach quietly, use cover, and be prepared for PvP encounters. Equip a silencer if you have one to avoid drawing attention.

ARC patrols are also common near electrical zones. Use stealth to avoid detection, or take down enemies quickly before they alert others. A quick, quiet loot run is better than a prolonged fight.

Final Thoughts: Mastering Light Bulb Scavenging

Light Bulbs may seem elusive at first, but with the right strategy, they become easy to farm. Prioritize Dam Battlegrounds for its guaranteed car spawns, focus on cars and lockers, and plan your routes to avoid wasted time.

Remember: Light Bulbs follow thematic spawn logic-stick to electrical zones, vehicles, and industrial containers, and you’ll never struggle to find them again. Whether you’re progressing the Expedition Project or stockpiling for currency, these tips will keep your Light Bulb supply steady. If you want more resources, you can choose to purchase cheap ARC Raiders BluePrints, materials, and items.

With a little practice, you’ll go from aimlessly searching electrical zones to gathering all the Light Bulbs you need in just a few raids. Gear up, plot your route, and start scavenging-your next Light Bulb is just a car hood or locker away.

How Players Can Get the Dam Surveillance Key in ARC Raiders

In the dynamic landscape of ARC Raiders, securing specific keys is essential for maximizing your loot and enhancing your gaming experience. One key of interest is the Dam Surveillance Key, which, while not consistently spawned in fixed locations, can be found in various residential areas throughout the game. This guide will equip you with effective strategies for locating the key and leveraging it to access valuable resources.

Understanding Key Locations

The Dam Surveillance Key does not have a guaranteed spawn point, as the game loot mechanics are fluid and can change between sessions. However, players can boost their chances of finding this key by focusing on common loot areas.

Residential Zones:These are prime spots for your search, where the likelihood of finding the Dam Surveillance Key is higher. Here are some effective places to check:

Drawers and Cabinets:Often found in houses, these spots are worth investigating. Make sure to open every drawer and cabinet you find; the key might be nestled among smaller items.Upgrade your arsenal instantly—choose MMOexp for reliable ARC Raiders Items and unstoppable gameplay.

Suitcases:Scattered throughout residential areas, both locked and unlocked suitcases can occasionally yield the key. Be diligent in your search, as it can be tricky to find.

While the Dam Surveillance Key is mainly used in the Dam Battlegrounds map, players might occasionally discover it in other areas. This unpredictability underscores the importance of thorough exploration—take your time to search every hidden corner.

Utilizing the Dam Surveillance Key

After successfully obtaining the Dam Surveillance Key, your next task is to find the right location to use it. Despite several potential key spawn points, it is crucial to understand there is only one place where it can unlock valuable resources.

Accessing the Water Treatment Control Building

The key is specifically utilized at the Water Treatment Control building, which is situated at the southern end of the Dam Battlegrounds map.

Here’s how to navigate to it effectively:

1.Enter from the Southern Entrance:This is the easiest entry point.

2.Follow the Path:After entering, take a right at the first intersection and then take another immediate right. The room you’re looking for will be in the corner.

Following these steps will lead you directly to the room where you can use the key, paving the way for significant rewards.

Rewards Inside the Water Treatment Control Building

Upon unlocking the room, players can expect to find a plethora of items that can enhance their gameplay experience. Here’s what you might discover:

Red Lockers:These lockers are known for containing valuable trinkets, including:

Uncommon Weapons:Ranging from high-quality melee weapons to firearms, these items can give you a considerable edge in combat.

High-Rarity Crafting Components:Essential for gear upgrades, these components can dramatically boost your capabilities.

Grenades:These tactical tools can be pivotal in turning the tide during battles.

Additional Containers and Loot

The room also contains raider-style containers that may feature various items:

Weapon Case:Often filled with rare weapons to enhance your arsenal.

Grenade Tube:Crucial for any combat situation, allowing you to pack extra firepower.

Raider Bag:Increases your inventory space, enabling you to carry more loot.

Ammo Case:Vital for staying well-stocked in battles, ensuring you’re prepared for anything.

Don’t Overlook Electrical Components

Finally, check the loot atop the main terminals for crucial electrical components, which may include:

Advanced Electrical Components:Key for crafting advanced technologies.

Wires and Magnets:These items are essential for various crafting recipes and can significantly boost your strategic options.

Navigating the world of ARC Raiders can be intricate, but knowing how to obtain the Dam Surveillance Key and where to use it enriches your adventure. Whether your goal is to acquire specific items or upgrade your equipment, thoroughly exploring residential areas and unlocking the Water Treatment Control building will yield substantial benefits.Don’t let your loadout hold you back—cheap ARC Raiders Materials now and stay ahead of the competition.